DIY Sock Monkey
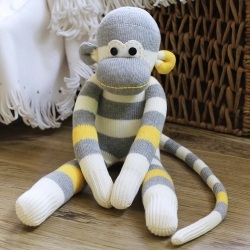
How To Sew Sock Monkey
Sewing Pattern: Download pattern here. It contains the eyes, ears and pattern for drawing the sock.
Materials:
Make: 1 (adult size)
1. Sock (crew length), 1 pair (I used striped sock so that it is easy to get the alignment right.)
2. White felt
3. Button eye 7/16″ [11.5mm], black, 2 (for toddler monkey, use 3/8″ button)
4. Embroidery Floss, yellow
5. Poly-fill stuffing material
6. Batting, or thick aquarium filter pad (you can get it from pet shop)
7. Letter size paper, 1
Tools:
1. Sewing machine
2. Sewing needle (prefer long) and pins
3. Scissors
4. Erasable fabric marker
5. Iron
6. Printer
Seam Allowance: approx. 1/8 – 1/4″
Note: for different sizes of sock monkeys, use different sizes of socks.
Since the sock is stretched after stuffed, thick sock yields better quality than thin sock.
Preparation
Prepare all the materials needed as described above.
Cut the eye from white felt by following the download pattern above. Mark the button eye position.
If your socks have folded cuff, remove the stitches carefully and don’t accidentally cut the sock. Flatten the fold to have a longer length.
Turn the sock to wrong side, align sock as per photo below. Press with warm iron.
Draw pattern on the sock with erasable fabric marker. Since not all socks are the same, I can’t make a standard pattern for you to trace.
If you haven’t had the pattern, download it here and print it out.
1. Align the stripes on both layers, pin.
2. Sew it with sewing machine, best if you have walking foot so both layers walk together. You can use hand sewn too.
3. Cut as per pattern.
4. Cut all pieces out.
Body
There will be an opening created between the legs. Use this opening to turn the sock right side out.
1. Insert the thumb into the leg till the feet end. “Pinch” the feet end with your thumb and index finger.
2. Push the index finger into the sock while thumb withdrawing from the sock to turn the sock right side out.
3. When the feet surface to the opening, pull the whole leg right side out.
4. Repeat the same to the other leg.
Finally, turn the body out. Smooth out all the seam line.
Turn the rest of the body parts, except the tail.
Stuff the legs with poly-fill stuffing material.
Fill the body round and to the firmness you like.
1. Sew slip / ladder stitch on the opening about 1/8″ from the raw edge. Let the thread loose and don’t pull it yet.
2. After finish slip stitch the opening, pull the thread to close the opening.
3. With the needle still on the sock, wrap 2 to 3 rounds of thread on it, pull the needle through while pressing the wrapping thread with your finger.
4. Insert the needle some where near by and come out from the other side. Pull the thread and cut it close to the sock. The thread will be hidden in the sock neatly. Always do this when you sew.
Arms
Stuff the arm with poly stuffing material until about 1/2″ from the opening.
Roll the monkey arm with you hands to make the stuffing even and nice. You can do this now and/or after sewing up the opening.
1. Stuffed monkey arms waiting to be sewn.
2. Run stitches about 1/4″ from the raw edge.
3. Pull the thread to gather a bit, push the raw edge into the arm.
4. Tighten up the opening by pulling the thread fully, make a few stitch across, knot and cut thread.
Both arms waiting to be assembled to the sock monkey.
Ears
1. Stuff the ear with small amount of poly-fill. Fold the raw edges in and slip stitch.
2. Pull the thread to close the opening. Knot.
3. Fold the ear vertically and slip stitch the opening seam line.
4. The finished ear looks like this.
Tail
Cut a piece of batting or thick aquarium filter pad, 3 times the width of the tail and the length when it is stretched or partially stretched.
Fold the batting three times and sew the end to the seam line of the tail end (wrong side).
Whip stitch the folded batting in place until the other end.
Sew the batting again to tail seam allowance about 1/4″ below the raw edge.
(Note: I used this method since stuffing with poly-fill to a long narrow tail is difficult and uneven.)
1. The batting and the tail before turning.
2. Insert finger into the sock and pull the tail right side out, portion by portion. Only turn the sock not the batting.
3. Repeat (2) until you reach to the end. Continue with the turning by inserting the batting into the tail until it fully gets into it.
4. Adjust the batting so that it looks neat. Fold the raw edge in and stitch it up just like the arms method.
Assembly
Body, arms, ears, tail, mouth, felt eye and button eyes are all set to be assembled into a sock monkey.
Divide the body into half, with top half being the face of the monkey where eyes and mouth are sewed to.
Position the felt eye with the center point align to the middle of the face portion. Pin it and sew with blanket stitch.
You may want to decorate the felt eye with a line of running stitch with 6 strands of embroidery floss before sewing it on the face.
Sew the button eyes to the marked positions of the felt.
To make the eyes attach to the face closely, insert your needle as deep as possible into the face, turn and come out to another point of the same eye. Pull thread tightly so that the eye attach closely to the face.
1. Mark the mouth on the face with erasable fabric marker. The shape is rounded corner rectangular, with bottom align to the face’s border and top covers a little on the felt eye.
2. Fold and baste the raw edge of the mouth, then pin it in place. Slip stitch around until you are about 1″ away from the starting point.
3. Stuff the mouth fully. Continue to slip stitch to the starting point to complete the mouth.
4. Embroidery branch stitches across the middle of the mouth. Tips: look out for the toe seam line of the sock, this is where the middle is.
1. Sew ears on the side of the face with slip stitch around (front and back of the ear).
2. The front of the ear is aligned to the side line of the monkey.
3. Position of tail.
4. Sew it with slip stitch around too.
Sew the arm on the marked position with slip stitch around. Knot the thread and insert the needle to the other side of the arm position. Pull the thread so that arm “squeezes” into the body, knot to secure the shape.
Sew another arm with slip stitch.
If you think that the arms are not “sunken” enough, pass the needle to the other side, pull the thread to get the result you want, knot the thread securely.
Provided you stuff you monkey very dense, sometime, you may find the monkey head is a little tall and pointy, this is normal due the shape of the adult sock. I found that kid’s and toddler’s sock do’t have this problem.
If you are happy with it, then it is OK. But, if you want to make the monkey head round like the one I made, the following step will be helpful.
1. The original pointy head due the toe compartment of the sock.
2. Pinch the top of the head to judge how much you want to sew to make it rounder. Mark the space with erasable marker. Gradually decrease the width from center towards the front and the back.
3. Join both lines with slip stitch.
4. Here is it, a rounder head for the monkey.
DIY Chrysanthemum Clock
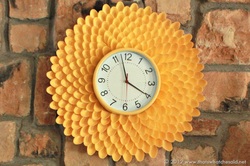
How To Make A Chrysanthemum Clock (or mirror, just replace the clock with one)
Items Needed:
2. I found the center of the circle, and placed my centered my store bought clock and traced around it so I would have an idea of how far to come down with my spoons.
3. Then I duplicated four things/areas from the back of my clock onto my foam board.
a. The center rectangle for the battery compartment (you will need a way to change/insert batteries to your clock)
b. The circle at the top to hang your clock
c. The two holes on each side (3 and 9 positions) where the clock was fastened onto the original cardboard packaging. These spots you will use to fasten your foam board to the clock!
4. (Next I wish I had spray painted the foam board at this point. I did not. Learn from me and spray paint your foam board! )
5. Cut your spoons! I used regular scissors. After a few you find the “sweet spot” on the spoon where they cut really nicely! Don’t worry if some of the handle is still on there, it will all get covered!
6. I did a quick trial run and just placed the spoons (without glue) in a small section so I could get a hang of the spacing needed and the number of layers to fill the area.
4. Start spacing out your outside ring and get gluing. Hot glue works great, dries fast and holds the spoons on the foam board nicely! Continue until you have all the area covered, overlapping your line you previously drew to outline the clock!
5. Next I covered the face of the clock with paper and painters tape. I didn’t want a white clock and a yellow flower so I needed to spray the clock yellow also. (an Xacto knife works well here to trim the tape perfect with the curve of the outside rim of the clock)
5. After all my spoons were glued and clock face was protected, I took them outside and gave each some light, even coats of Yellow spray-paint.
6 After that dried I brought it inside and then cut two small squares out of some scrap foam board that I saved from step 1. I cut the squares larger than the holes I cut at the 3 and 9 position. So your measurements will depend on the size of holes you cut.
7. I used a 1” screw to go through the small square piece, through the openings I cut and directly into the back of the clock where it had been originally screwed to the store packaging. Snug as a But in a Rug!
Note: You might wonder why I cut holes for the screws (3 and 9 positions) rather than just pushing the screw through the foam board on the clock (like I did for the small squares). The reason is that the clock sits on top of part of the spoons on the front, so the larger holes gave me wiggle room to get the clock centered and made it MUCH easier to get an exact location on the screw holes located in the back of the clock!
8. Pop in a battery and set the time! Hang and enjoy your fun new clock!
Items Needed:
- Plastic Spoons (I used roughly 250)
- Scissors
- Hot Glue Gun/Glue Sticks
- Foam Board
- A clock (I bought a cheapy!)
- (2) 1” screws or longer, philips screwdriver
- Xacto Knife
2. I found the center of the circle, and placed my centered my store bought clock and traced around it so I would have an idea of how far to come down with my spoons.
3. Then I duplicated four things/areas from the back of my clock onto my foam board.
a. The center rectangle for the battery compartment (you will need a way to change/insert batteries to your clock)
b. The circle at the top to hang your clock
c. The two holes on each side (3 and 9 positions) where the clock was fastened onto the original cardboard packaging. These spots you will use to fasten your foam board to the clock!
4. (Next I wish I had spray painted the foam board at this point. I did not. Learn from me and spray paint your foam board! )
5. Cut your spoons! I used regular scissors. After a few you find the “sweet spot” on the spoon where they cut really nicely! Don’t worry if some of the handle is still on there, it will all get covered!
6. I did a quick trial run and just placed the spoons (without glue) in a small section so I could get a hang of the spacing needed and the number of layers to fill the area.
4. Start spacing out your outside ring and get gluing. Hot glue works great, dries fast and holds the spoons on the foam board nicely! Continue until you have all the area covered, overlapping your line you previously drew to outline the clock!
5. Next I covered the face of the clock with paper and painters tape. I didn’t want a white clock and a yellow flower so I needed to spray the clock yellow also. (an Xacto knife works well here to trim the tape perfect with the curve of the outside rim of the clock)
5. After all my spoons were glued and clock face was protected, I took them outside and gave each some light, even coats of Yellow spray-paint.
6 After that dried I brought it inside and then cut two small squares out of some scrap foam board that I saved from step 1. I cut the squares larger than the holes I cut at the 3 and 9 position. So your measurements will depend on the size of holes you cut.
7. I used a 1” screw to go through the small square piece, through the openings I cut and directly into the back of the clock where it had been originally screwed to the store packaging. Snug as a But in a Rug!
Note: You might wonder why I cut holes for the screws (3 and 9 positions) rather than just pushing the screw through the foam board on the clock (like I did for the small squares). The reason is that the clock sits on top of part of the spoons on the front, so the larger holes gave me wiggle room to get the clock centered and made it MUCH easier to get an exact location on the screw holes located in the back of the clock!
8. Pop in a battery and set the time! Hang and enjoy your fun new clock!
DIY Melted Crayon Art
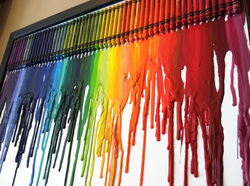
How To Make Melted Crayon Art
Melting crayon art is an easy art project that doesn't require a lot of supplies. Go ahead, give it a try! Bring out your inner artist and create a colorful masterpiece of your own.
Supplies Needed to Make Melting Crayon Art:
Play the video below for a video tutorial on how to do it.
Melting crayon art is an easy art project that doesn't require a lot of supplies. Go ahead, give it a try! Bring out your inner artist and create a colorful masterpiece of your own.
Supplies Needed to Make Melting Crayon Art:
- Canvas
- Crayons
- Glue or hot glue gun
- Hair dryer or heat gun
- Prepare you work space. Put down some plastic or newspaper.
- Lay your canvas flat and glue the crayons in a row at the top of the canvas. Omit the black and brown crayons for this project.
- Prop your canvas upright against something, like the wall, so the wax will run downward on the canvas when you melt it.
- Put your hair dryer on the hottest setting but the lowest blowing setting so the melted wax doesn't blow all over the place.
- Hold the hair dryer in a downward position over the crayons so that the wax melts and runs down the canvas.
Play the video below for a video tutorial on how to do it.
DIY Sweet Caramel Apple Pumpkins
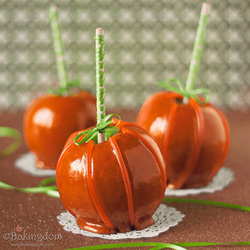
How To Make Caramel Apple Pumpkins
First thing, wash your apples thoroughly with soap and warm water. The warm water will help melt the wax off of the apples, while the soap washes it away. It’s important to remove as much wax as possible, so that the caramel will stick to the apples better.
I chose to use green apples for these, because I love the tartness of the apple with the sweet caramel candy.
Next up, sand your apples gently with fine grit sandpaper (the apple on the left has been sanded). Again, this is a step that will help the melted caramel stick to the apples, rather than sliding right off. You can skip this step, but I find it very helpful.
Now the apples need their sticks. I found these fantastic, fat wooden skewers at Michaels. They’re made by Wilton, and the end that is in the apple is pointed. They worked beautifully and they were cheap (like, two bucks for two dozen).
Now that the apples are all ready to go, it’s time for the caramel. You only need brown sugar, unsalted butter (margarine for vegan), sweetened condensed milk (*vegan/dairy free readers, see note), corn or maple syrup, vanilla extract, and cinnamon (optional). I also like to add anywhere from 1/4 to 1 teaspoon of salt. Because I love salted caramel. A lot.
To make these more pumpkin-y, I used plenty of orange food coloring.
*There are several homemade recipes for vegan sweetened condensed milk, like this one. Or you can buy products like this one at the store. I’ve never tried either, but it’s great to know there are options out there.
When dipping the apples, go in at about a 45 degree angle. You’ll coat more surface area of the apple that way, and you’ll also prevent air bubbles from forming on the bottom.
Slowly turn the apple while it’s submerged in the caramel, covering as much or as little of the apple as you like. I like to get them as covered as possible. :)
Once it’s coated, let it drip over the pan for a minute or so, to get rid of excess caramel.
When it’s ready, place the dipped apple on a baking sheet lined with parchment paper, or…
…have a little more fun. While someone holds the dipped apple (over the pan of caramel), wrap a length of orange (or black) shoestring licorice across the bottom of the apple and up the sides.
Continue wrapping licorice on the apple until you have four pieces attached, dividing the apple into eight wedges.
The licorice immediately sticks and looks so fun. If your licorice pieces are too long, just snip the extra bits off once the caramel has hardened up a bit.
DIY Crayon Monogram
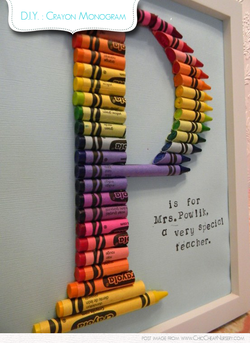
How To Make A Crayon Monogram
Print your letter out on a scrap piece of paper.
Arrange crayons over letter.
Cut crayons individually to length using a sharp knife and cutting board.*
Glue crayon pieces together using a glue gun.
Then glue the crayon letter to a nice piece of stiff paper.
Frame.
*diy tip: When you’re making the straight cuts it helps to roll the crayon under your knife to score it all the way around, then it just snaps in the center leaving a cleaner cut. Unfortunately it doesn’t work with the slanted cuts.
DIY Pumpkin Pie-Filled Cupcakes

How To Make Pumpkin Pie-Filled Cupcakes
Ingredients:
Techniques Used:
Tools:
Instructions:
Step 1: One day in advance, make cookies. Prepare cookie dough and roll out 1/8 in. thick. Cut cookies using pumpkin cutter from set. Bake and cool completely.
Step 2: Prepare royal icing. Tint portions orange and green. Use tip 3 and full-strength orange icing to outline pumpkin. Use tip 3 and thinned orange icing to fill-in pumpkin. Let set. Use tip 6 and full-strength green icing to fill-in stem. Let set.
Step 3: Bake mini pumpkin pies in mini muffin pan following recipe directions. Cool completely.
Step 4: Fill standard cupcake baking cup 1/4 full with cupcake batter. Place cooled mini pumpkin pie in center of cupcake batter. Cover pie with cupcake batter, filling cavity 3/4 in. full. Bake and cool completely.
Step 5: Prepare whipped icing mix following package directions. Use tip 1M, disposable decorating bag and whipped icing to pipe swirl on top of cupcake. Cover with sprinkles.
Step 6: Position pumpkin cookies on top of cupcakes.
Ingredients:
- Roll-out Cookie Dough
- Meringue Powder (used in royal icing)
- Royal Icing
- Orange Icing Colour
- Kelly Green Icing Colour
- Favorite Pie Crust Recipe
- Favourite Mini Pumpkin Pie Recipe
- Your favorite cupcake recipe or mix
- Whipped Icing Mix
- Autumn Micro Leaves Sprinkles
Techniques Used:
Tools:
- Rolling PinTip:
- 6-piece Harvest Mini Metal Cutter Set
- Non-Stick Cookie Sheet
- 10 in. x 16 in. Non-Stick Cooling Grid
- Tip: 3
- 12 in. Disposable Decorating Bags
- Tip: 6
- Mini Muffin Pan
- White Standard Baking Cups
- Standard muffin pan
- Tip: 1M (2110)
Instructions:
Step 1: One day in advance, make cookies. Prepare cookie dough and roll out 1/8 in. thick. Cut cookies using pumpkin cutter from set. Bake and cool completely.
Step 2: Prepare royal icing. Tint portions orange and green. Use tip 3 and full-strength orange icing to outline pumpkin. Use tip 3 and thinned orange icing to fill-in pumpkin. Let set. Use tip 6 and full-strength green icing to fill-in stem. Let set.
Step 3: Bake mini pumpkin pies in mini muffin pan following recipe directions. Cool completely.
Step 4: Fill standard cupcake baking cup 1/4 full with cupcake batter. Place cooled mini pumpkin pie in center of cupcake batter. Cover pie with cupcake batter, filling cavity 3/4 in. full. Bake and cool completely.
Step 5: Prepare whipped icing mix following package directions. Use tip 1M, disposable decorating bag and whipped icing to pipe swirl on top of cupcake. Cover with sprinkles.
Step 6: Position pumpkin cookies on top of cupcakes.
DIY Frilly Apron
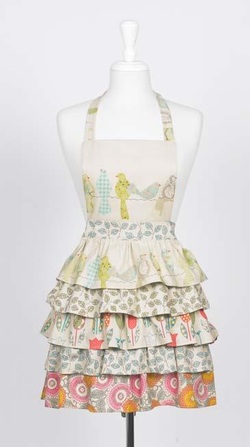
How To Make A Frilly Apron
MaterialsFabrics from the Fly Away range
60cm fabric 1 – green birds
80cm fabric 2 – blue leaf
20cm fabric 3 – green leaf
20cm fabric 4 – coral tulips
30cm fabric 5 – coral floral
Gutermann 100% cotton thread – neutral colour
Scissors
Iron
Tape measure
Chalk pencil
Pins
Sewing machine
Cutting
• From fabric 1 cut two 27cm x 25cm rectangles for the bib, two 72cm x 6cm strips for straps & one 15cm x width of the fabric for frill.
• From fabric 2 cut one 65cm x 25cm rectangle for apron skirt, one 65cm x 12cm strip for waistband, two 75cm x 11cm strips for ties & one 15cm x width of the fabric for frill.
• From each of fabrics 3 & 4 cut one frill 15cm x width of fabric.
• From fabric 5 cut one frill 24cm x width of fabric.
Step 1: Hem both sides and lower edges of all frills. Neaten the top edge of all frills with zigzag stitch or overlocker. Sew a gathering stitch along the top edge of all frills and gather evenly.
Step 2: Hem both sides of the apron skirt. Using chalk pencil rule a line across the skirt 8cm from the top edge then another line 16cm from the top edge.
Step 3: Pin fabric 2 frill to lower edge of skirt with right sides together, align raw edges, match centres and gather to fit. Distribute gathers evenly. Place fabric 5 (24cm) frill right side down onto wrong side of fabric 2 frill match centres, align raw edges and gather to fit. Pin in place. With fabric 2 frill sandwiched between fabric 5 frill and skirt, sew using 1cm seam allowance. Press seam allowance towards skirt.
Step 4: Pin fabric 4 frill wrong side down onto right side of skirt at 16cm sewing line, match centre fronts and gather evenly. Sew in place.
Step 5: Add fabric 3 frill as in step 4.
Step 6: Add fabric 1 frill as in step 4 aligning raw edge of the frill with top edge of skirt.
Step 7: Turn one long edge of waistband under 1cm and press. Pin other long edge across top of skirt with right sides together, align raw edges and match centre fronts. Sew waistband to top edge of apron. Press seam towards waistband.
Step 8: Fold ties in half lengthways right sides facing, using one 1cm seam allowance sew across one end and down the side, trim corners, turn right side out and press. Repeat for the bib straps.
Step 9: Pin ties to right side at each end of waistband, fold waistband over, right sides together, encasing ties and sew across ends of waistband, trim corners. Turn waistband right side out and press.
Step 10: Pin straps to top edge (25cm) of front bib leaving a 1cm seam allowance at each side. Pin back to front bib with right sides facing and sew around three sides leaving bottom edge open, catching ties in top. Neaten lower edges of bib. Place ironed edge of waistband over the seam and pin on the outside. Pin bib to ironed edge of waistband, matching centres. Sew close to the seam on the outside, catching ironed edge of facing and bib on underside. Pin bib to top edge of waistband and sew close to folded edge. Press.
DIY Circle Zip Earbud Pouch
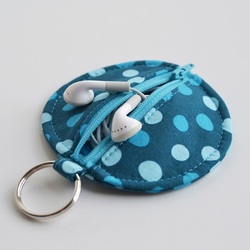
How To Make A Circle Zip Earbud Pouch
First, download the pattern file HERE.
Cut from main fabric:
1 circle
2 half circles
1 tab
Cut from lining fabric:
1 circle
2 half circles
Cut from batting (or medium weight interfacing, if you prefer):1 circle
2 half circles
You will also need a 1″ wide nylon 5″ or longer zipper.
Place one lining half circle right side up and place the zipper right side up on top. Align top edges.
Place a main fabric half circle wrong side up (right side together with the zipper). Place batting on top.
Sew with a 1/4″ seam allowance. It’s important to use a 1/4″ SA here because the zipper is 1″ wide, and if we use two 1/4″ seam allowances we are subtracting 1/4″ from each half circle but adding 1/2″ in the middle of the zipper. Perfect!
Fold back and repeat with the other side. Then trim the batting as best you can without cutting into the fabric.
Fold everything back and press well.
Make sure the back side is away from the zip as well.
Topstitch 1/8″ away from the edge with a longer stitch length.
Now make the tab for the side. Fold the tab in fourths – Fold the edges to the center and then fold in half and topstitch.
Now unzip the zipper part way and “tack” the zipper closed at the edge of the circle.
Fold the tab in half and place it with the raw edges towards the outside of the circle, folded edge in, right over the zipper and sew it at the same spot where you tacked the zip.
Now you need to place the circle pieces wrong sides together with the batting in the middle. Place the lining circle wrong side up. (I’m using solids so it doesn’t matter, but if you are using a print, place it right side DOWN, wrong side up.) Place the cotton batting on top. Place the main fabric circle on top of that. Like a quilt sandwich. It’s so small you don’t really need to pin. If you used fusible interfacing in place of batting, just place the two fabrics wrong sides together.
You should now have these two pieces. Make sure the zipper pull is IN THE MIDDLE of the circle. You don’t want to end up cutting it off!
Flip the full circle piece over on top of the piece with the zipper, right sides together. (Now, if I was showing you how to do this the “right” way, I would tell you to baste with a 1/8″ seam allowance around the outsides first. But this is a small pouch, and it will be fine if you don’t baste. Plus, it’s just for fun. Not basting also makes it easier to trim the batting after sewing!)
Time to sew! Start anywhere on the circle and sew all the way around with a 3/8″ seam allowance.
Since we didn’t use interfacing AND we are sewing in a circle, you might get some puckering (fusible interfacing helps keep the fabric stiffer so it doesn’t pucker as much.) It’s OK. Just lift up the presser foot every few stitches, pivot, smooth out the pucker and keep sewing.
Since there won’t be a ton of reinforcement at those zipper edges, I like to stitch across them a couple times. Just hit your backstitch button a couple times, taking a few stitches across them back and forth.
Now cut off the zipper ends. Just don’t use your good fabric scissors! I keep an extra pair of scissors around of opening packages, cutting paper and cutting off ends of zippers.
Now pull back the fabric and try to trim as much batting out as you can without slicing fabric. I use sharp, tiny scissors for this. It’s not imperative but I think it helps reduce bulk.
Decision time! Since it’s difficult to hand stitch a curved opening shut, there will be some raw edges that we need to deal with. You have two options:
1. Trim the seam allowance to 1/4″. Zig zag, overlock and serge the raw edges before turning the pouch right side out. I also clipped the curves every 1/2″, but you probably don’t have to. The raw edges will be tucked way inside the pouch.
2. Trim the seam allowances a bit less than 1/4″. I used pinking shears but it will be fine if you don’t – just clip the curves. Turn the pouch right side out. Topstitch around the outside with a 1/4″ seam allowance to enclose the raw edges.
When I topstitched, I didn’t stitch over the open end of the zipper so that I could still close it all the way. Backstitch at the beginning and end or pull your threads to the back and tie them off. I always use a longer stitch length when I topstitch. It looks nicer and is less likely to pucker when you have so many layers. Somewhere between 3.5-4mm.
Add a split ring and your earbuds and you are done!
DIY Thanksgiving Turkey Cake
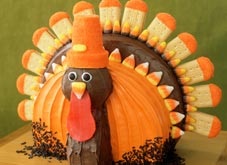
How To Make A Thanksgiving Turkey Cake
Ingredients
Directions
Preheat oven to 350°. Grease 2 9-inch baking pans and dust with flour.
Combine cake mix, pudding mix, 1 cup milk, oil and eggs in a large mixing bowl. Beat on medium speed for about 3 minutes until well combined, occasionally scraping the sides of the bowl.
Pour batter into prepared pans and bake for 30-35 minutes until a toothpick inserted in the center comes out clean. Cool 5 minutes. Remove from pans and allow cake to cool completely on wire racks.
Cut off the bottom quarter of one circles and the bottom third of the other. Out of the parts that were removed from the circles, cut the turkey’s neck and a circle for the turkey’s head. (Use the picture of the cake as a guide).
Freeze the cake pieces for one hour so they are easier to frost and handle.
Meanwhile, stir together the powdered sugar and 1 tablespoon milk in a small bowl. Add orange food coloring until the frosting is bright orange. Dip the ends of each cookie into the frosting and place on wax paper. Place the ice cream cone upside down on the wax paper and cover with the orange frosting. Allow the frosting to dry and harden.
Open the jar of vanilla frosting and stir in food coloring until bright orange.
Once the cake pieces have been in the freezer for one hour, remove them and place them on a flat surface. Lay the larger of the two semicircles flat on the surface you desire to serve it on. Frost it with the chocolate frosting, including the flat bottom edge where it was cut.
Place the smaller semi-circle on top, lining up the flat bottoms. Frost the flat bottom of the top cake with the orange frosting. Using a spatula underneath and your hands, tilt the cake upright so the flat bottoms are facing down and the frosting “glues” the cake down.
Frost the rest of the smaller semi-circle with the orange jar frosting and frost the back of the larger semi-circle with the chocolate frosting.
Place the neck on the front of the cake and frost with the chocolate frosting.
Place the head on top of the neck and frost with the chocolate frosting.
Use extra frosting to “glue” the ice cream cone on top of the head as a hat.
Arrange the cookies to make feathers around the large semi-circle cake. Decorate with candy corn and chocolate sprinkles.
Cut out a wattle (that long dangling red thing) from the fruit roll up and use chocolate candy pieces for the eyes.
Ingredients
- 1 package (18 ounce) yellow cake mix
- 3 ounce vanilla instant pudding mix
- 1 cup milk
- 1 cup oil
- 4 large eggs
- ¼ cup powdered sugar
- 1 tablespoon milk
- orange food coloring (combine red and yellow if you don’t have orange)
- 13 oval-shaped cookies (nothing very heavy)
- 1 ice cream cone
- 1 jar store-bought chocolate frosting
- 1 jar store-bought vanilla frosting
- candy corn
- chocolate sprinkles
- chocolate candies
- 1 fruit roll-up (red)
Directions
Preheat oven to 350°. Grease 2 9-inch baking pans and dust with flour.
Combine cake mix, pudding mix, 1 cup milk, oil and eggs in a large mixing bowl. Beat on medium speed for about 3 minutes until well combined, occasionally scraping the sides of the bowl.
Pour batter into prepared pans and bake for 30-35 minutes until a toothpick inserted in the center comes out clean. Cool 5 minutes. Remove from pans and allow cake to cool completely on wire racks.
Cut off the bottom quarter of one circles and the bottom third of the other. Out of the parts that were removed from the circles, cut the turkey’s neck and a circle for the turkey’s head. (Use the picture of the cake as a guide).
Freeze the cake pieces for one hour so they are easier to frost and handle.
Meanwhile, stir together the powdered sugar and 1 tablespoon milk in a small bowl. Add orange food coloring until the frosting is bright orange. Dip the ends of each cookie into the frosting and place on wax paper. Place the ice cream cone upside down on the wax paper and cover with the orange frosting. Allow the frosting to dry and harden.
Open the jar of vanilla frosting and stir in food coloring until bright orange.
Once the cake pieces have been in the freezer for one hour, remove them and place them on a flat surface. Lay the larger of the two semicircles flat on the surface you desire to serve it on. Frost it with the chocolate frosting, including the flat bottom edge where it was cut.
Place the smaller semi-circle on top, lining up the flat bottoms. Frost the flat bottom of the top cake with the orange frosting. Using a spatula underneath and your hands, tilt the cake upright so the flat bottoms are facing down and the frosting “glues” the cake down.
Frost the rest of the smaller semi-circle with the orange jar frosting and frost the back of the larger semi-circle with the chocolate frosting.
Place the neck on the front of the cake and frost with the chocolate frosting.
Place the head on top of the neck and frost with the chocolate frosting.
Use extra frosting to “glue” the ice cream cone on top of the head as a hat.
Arrange the cookies to make feathers around the large semi-circle cake. Decorate with candy corn and chocolate sprinkles.
Cut out a wattle (that long dangling red thing) from the fruit roll up and use chocolate candy pieces for the eyes.
